Violin Scales For Beginners
Introduction
Scales are the fundamental of any piece of music. They are basically a set of rules for picking the right notes and arranging them so that the music makes sense. It sets the music's “language,” giving it an identity, a certain quality, character, or feeling. For example, composers of the past wrote in specific keys, i.e., scale keys to depict different moods such as jubilance or sorrow. Certain scales can also reveal which culture the music came from; for example, there is a huge difference between the scales of Western music compared to Javanese gamelan music. If you are not familiar with the basic concept of scales, you may learn it here.
Scales On Violin
In Western music tradition, there are two types of scales, i.e., major and minor, and each scale has 7 notes. Since there are 12 distinct notes in music, musicians need to master 24 scales (12 major and 12 minor) so they can play music in any given key. To gain such proficiency, it takes diligence and many years of practice.
When it comes to the violin, or any other bowed string instrument, finding one note can be a challenge, let alone finding all the notes for the 24 scales. Firstly, there is no indicator of where a note is, unlike a keyboard instrument such as a piano or a fretted instrument such as a guitar. The fingerboard of a violin is pitch black and has a smooth texture. Anywhere that we touch on the fingerboard can be a note, but what note exactly? Secondly, the range of a violin is huge, spanning 4 octaves from the lowest to the highest note. A violinist needs to be able to pinpoint notes accurately from one end to the other. As someone who has been playing the violin for decades, I can say that this task is anything but easy. To quote a violin teacher with whom I worked in the past, “The fingerboard is a jungle (that one may get lost in).”
“The violin fingerboard is a jungle.”
The Violinist's Tools
If a pianist wanted to play a note, they would just need to press the right key. For a guitarist, the finger would have to be on the right fret. A player of either of these instruments simply needs to “select” the note. For violinists, however, with the exception of the four open strings, E-A-D-G, there is no way to “select” our notes. We have to find and create our notes every time we play it. There are two tools that we need to rely on: our ears and our fingers.
Anyone who wants to start learning the violin should be able to identify and recall different pitches from memory. One can check this ability by playing several notes (one note at a time) on a piano/keyboard and singing to that given pitch. Then try doing the same with a sequence of four or five notes. If the piano and the sung notes match, congratulations! You can learn the instrument. However, if completing the task is difficult, violin learning will be difficult. The ears are used to guide the fingers so they are placed correctly on the fingerboard. One needs to know what the correct pitch, scale, and tone are in any given musical situation. That relies entirely on having a good sense of hearing.
The human hand is nature's wonder: it can do many things with its sensitivity, flexibility, and strength. In the context of violin playing, even when there are no guide marks on the fingerboard, the left hand itself can be used as a reference to find the notes. However, this needs years of proper training to reach its potential. The left hand is a really extensive subject, so I will focus only on the arrangement of the fingers, i.e., finger patterns as they will make our search for violin notes easier.
Finger Patterns
Since all major and minor scales have semitones, violin fingering relies on the positions of semitones within the scale. There are four finger patterns and each pattern depends on which fingers need to be paired closely together.
N.B. Practise them every day until you can master all the patterns. You will thank me later.
Fingering Diagram/TAB
Figuring out how to play scales can be challenging for a beginner, especially if they go through the music theory route. I would prefer a new student to start playing immediately, effectively, and beautifully. They can figure out the theory part later. To facilitate and speed up learning/practising, I have come up with violin “tablatures” so they can provide clear visualisation of the fingerboard. Not to be confused with the standard music staff (5 lines), the violin TAB has four lines, representing the four strings of the violin. From top to bottom, the strings are E, A, D, and G. Unlike guitar TABs however, the number represents the fingering, not the fret position (since a violin is fretless). Thus, it is very important to know the key note before playing.
The number in the circle represents the fingering for each note.
- Index finger
- Middle finger
- Ring finger
- Little (pinky) finger
The sheet music/tablature for the following scale and arpeggio exercises can be downloaded here.
Basic Pattern - Perfect 4th Interval

In general, the distance between the first and fourth fingers must always be a perfect 4th. Exception is in Finger Pattern 4.
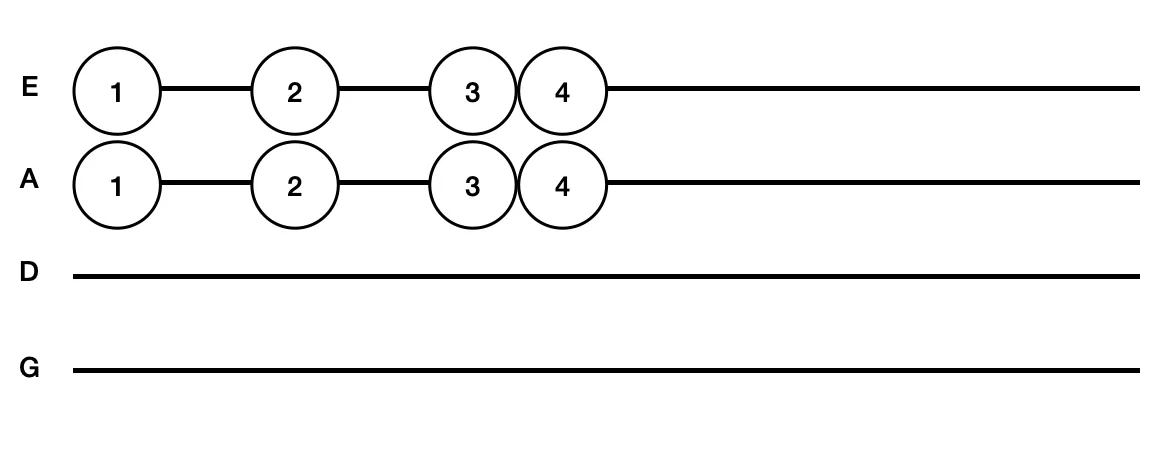
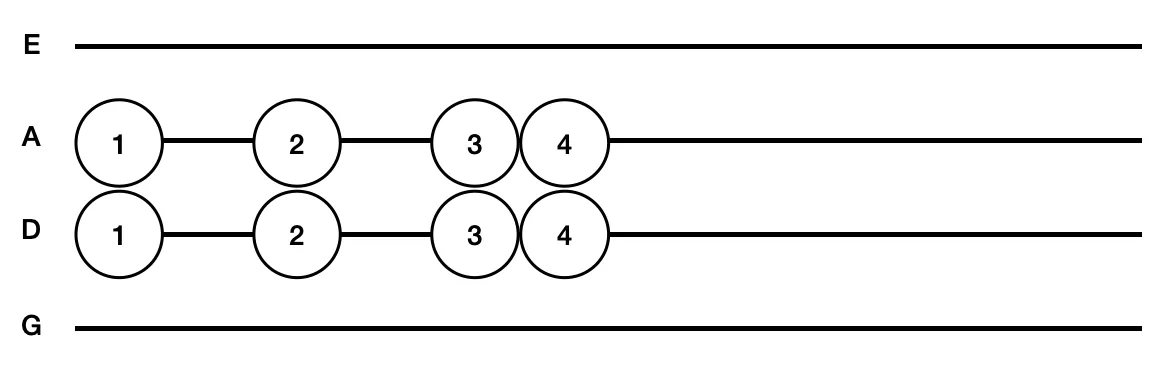
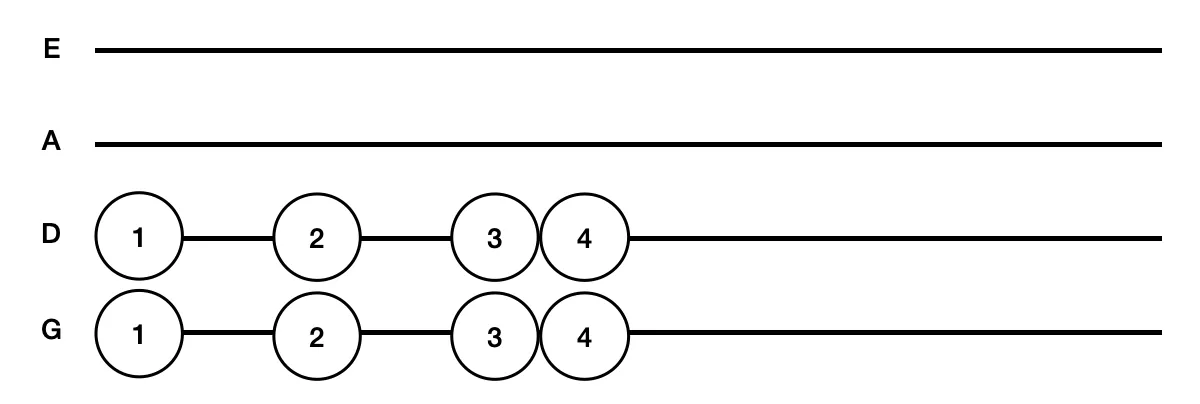
I. Finger Pattern 1 (Minor)

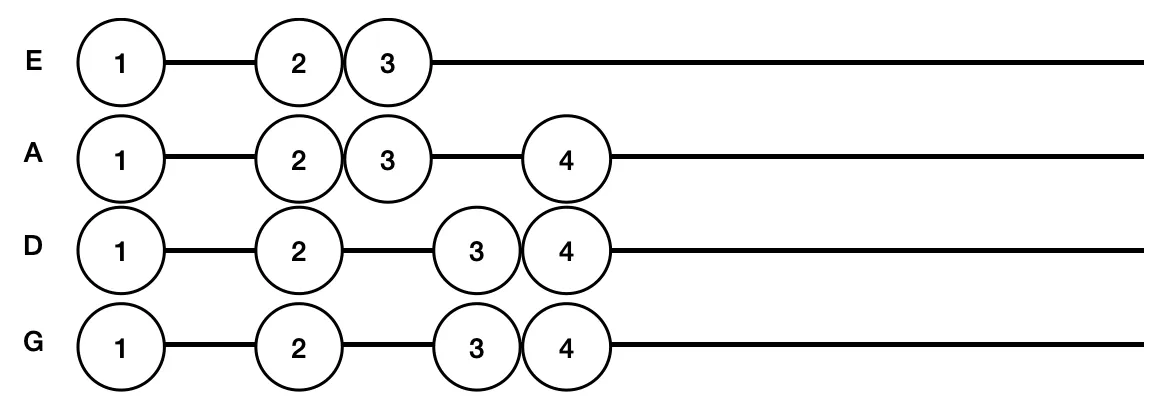
This is the most common pattern for beginners as it is very natural for the hand. The second and third fingers are paired. With this pattern, we can play scales that start on open strings: A major, D major, and G major use this pattern. There are many easy popular/folk tunes that can be played using this pattern. Beginners may skip playing the fourth finger.
N.B. The description for each pattern e.g., minor, phrygian, major, and lydian, is for pattern reference only, not for the scale itself.
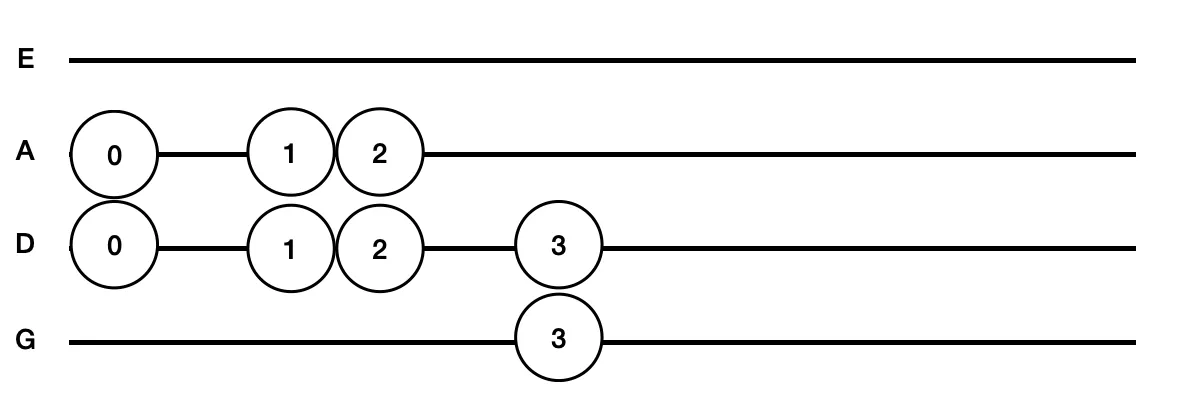
A Major Scale (Starting On Open String)
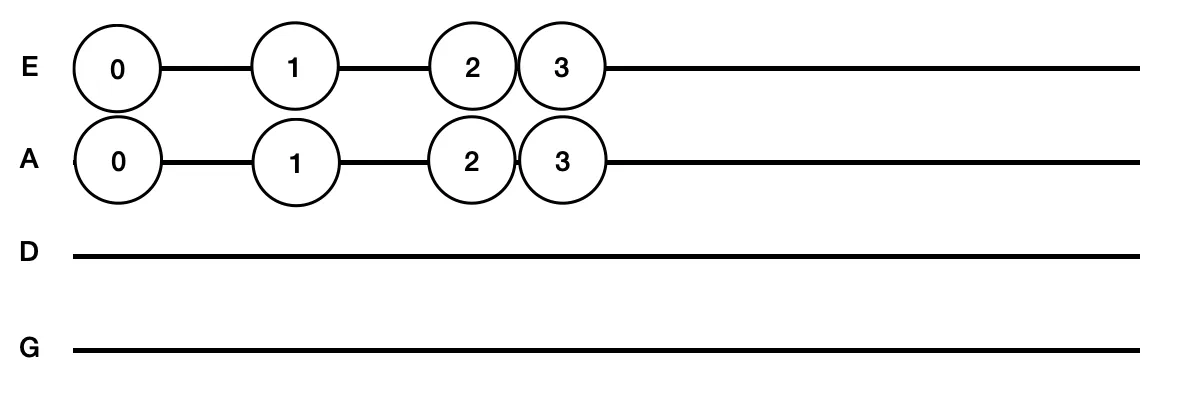
D Major Scale (Starting On Open String)
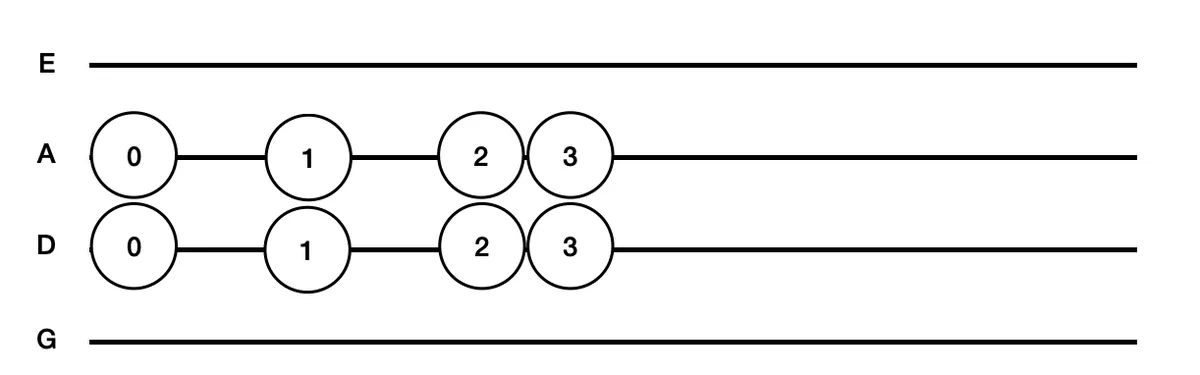
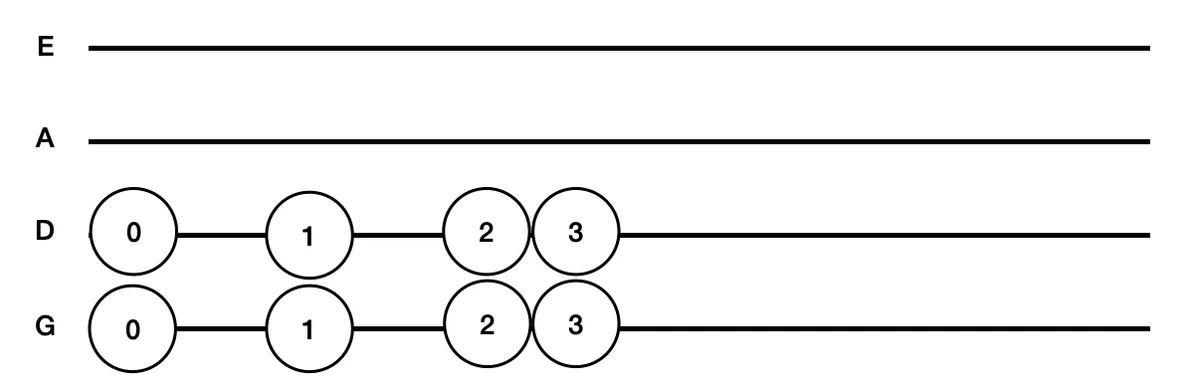
G Major Scale (Starting On Open String)
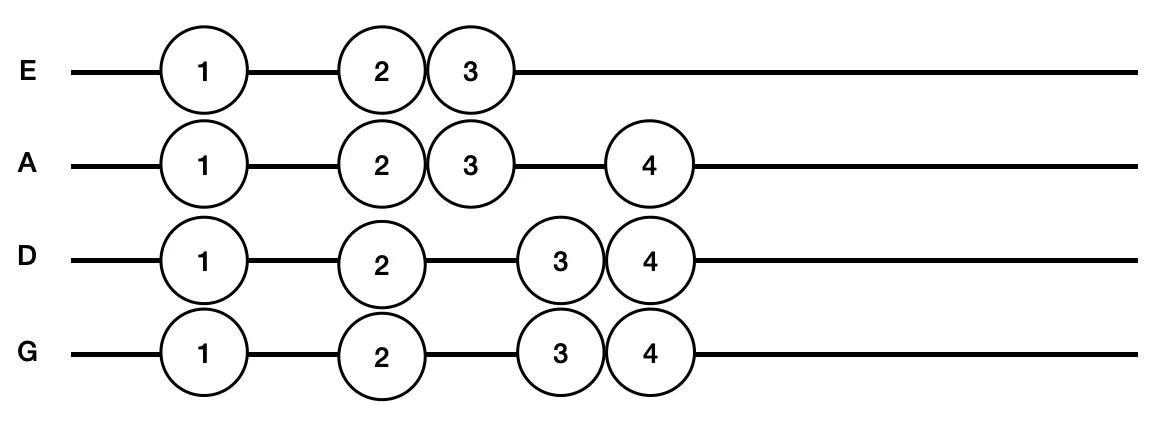
II. Finger Pattern 2 (Phrygian)

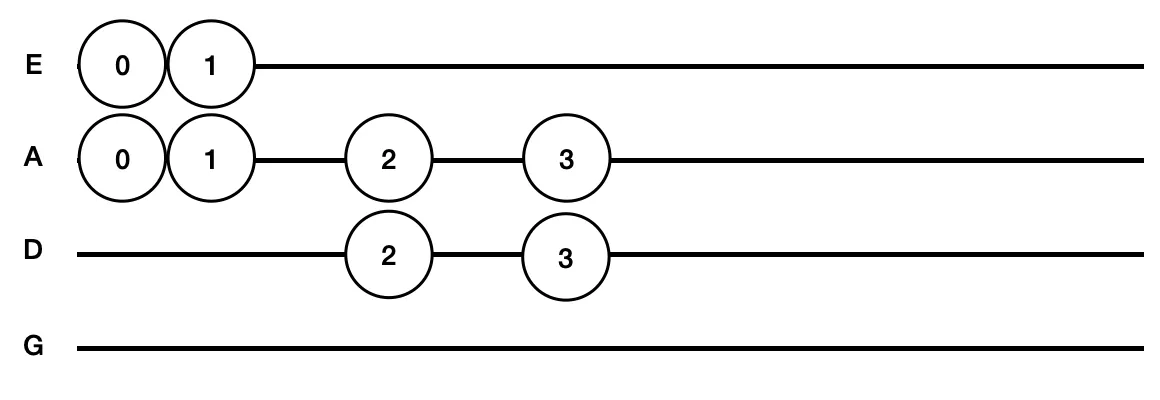
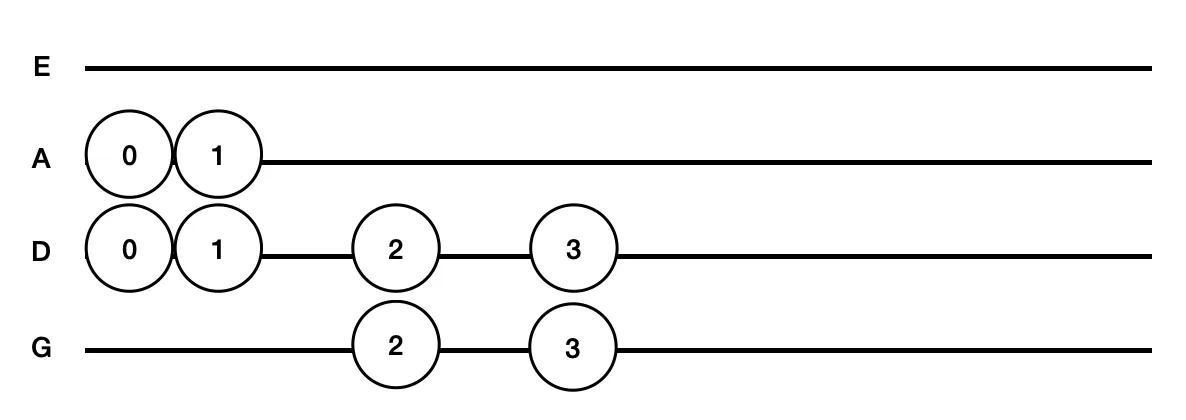
This is the second most common pattern, as the first and second fingers are paired. Relatively easy to play, with this pattern, we can play scales starting on the third finger, which are C major and G major (starting on D string).
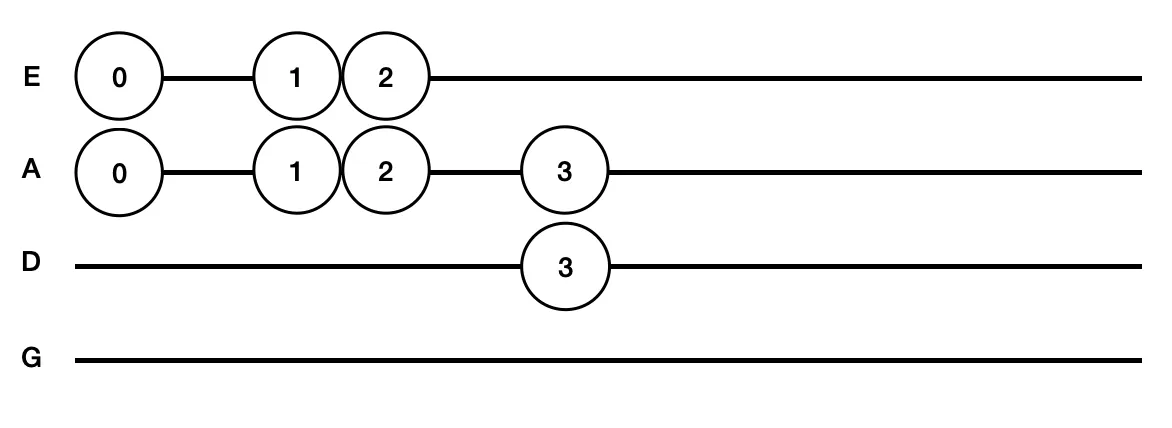
G Major Scale (Starting On D String, 3rd Finger)
C Major Scale (Starting On G String, 3rd Finger)
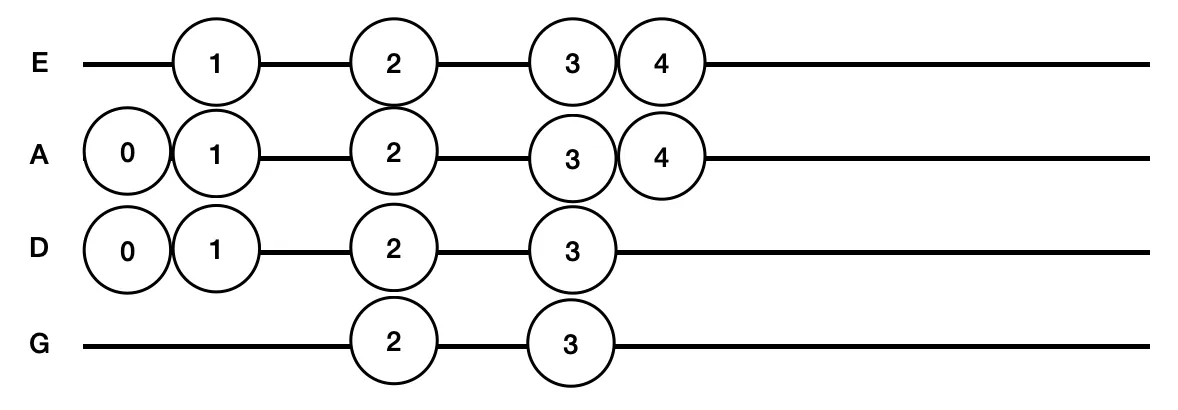
By combining with the previous finger pattern, we can start using all the four strings and play G major in two octaves.
N.B. Do note that for this scale, the pattern for the first two strings is different than on the last two strings.
G Major Scale 2 Octaves

III. Finger Pattern 3 (Major)

This is arguably the most important finger pattern on the violin. The third finger has to be moved up towards the fourth finger creating a pair. A little challenging for a beginner, as the distance between the second and third finger is further than usual, and notes can go out of tune easily. Also, this pattern relies a lot on the fourth finger, which is weaker than the other three. But with time and constant practice, it is not impossible to master. With this finger pattern, one can play in any key on the violin. For now, we can practise all the scales starting on the first finger: B major, E major, A major; then B♭ major, E♭ major, and A♭ major.
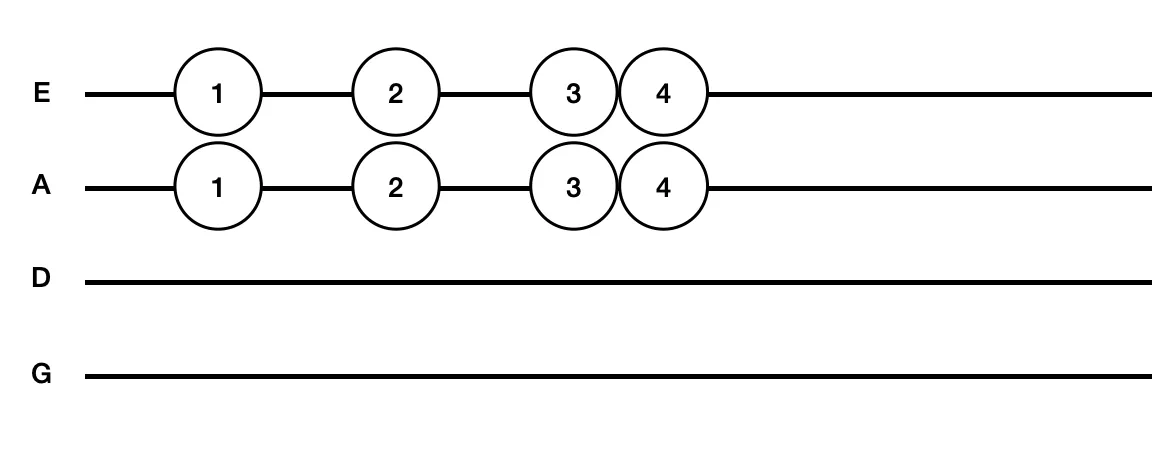
B Major Scale (Starting On A String, 1st Finger)
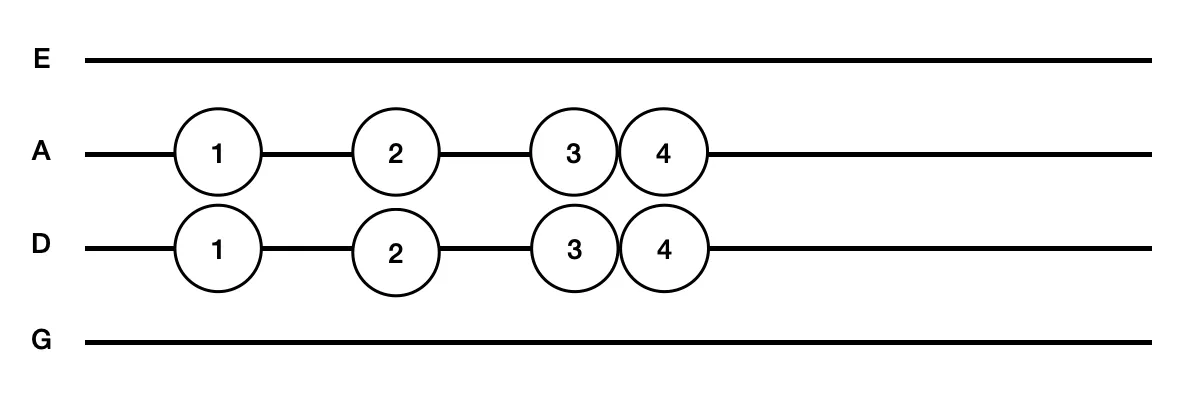
E Major Scale (Starting On D String, 1st Finger)
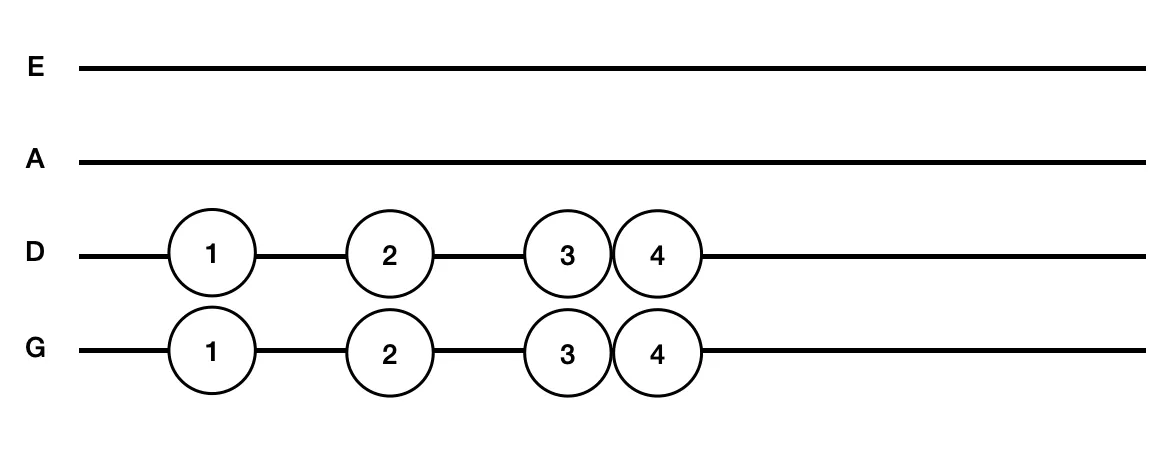
A Major (Starting On G String, 1st Finger)
B♭ Major (Starting On A String, 1st Finger)
E♭ Major (Starting On D String, 1st Finger)
A♭ Major (Starting On G String, 1st Finger)
By combining with Finger Pattern 2, we can play A major and A♭ major scales in two octaves. Pretty neat for a beginner, don’t you think?
A Major 2 Octaves (Starting On G String, 1st Finger)
A♭ Major 2 Octaves (Starting On G String, 1st Finger)
Basic Pattern - Augmented 4th/Tritone Interval

As the given illustration suggests, move the first finger from its usual position back towards the nut of the violin. The fourth finger remains in place. The stretching distance between the first and fourth fingers should be larger than for the perfect 4th interval in the previous finger patterns.
IV. Finger Pattern 4 (Lydian)

This finger pattern is rather awkward, especially for beginners. It is the hardest as there are no semitones in this pattern. As such, no fingers will be paired. The trick here is to stretch the first (index) finger backward rotate the left palm inward as required. Also, one needs to be familiar with the tritone interval.
With this pattern, we can play scales starting on the second finger: F major and B♭ major (starting on G string).
F Major (Starting On D String, 2nd Finger)
B♭ Major (Starting On G String, 2nd Finger)
In combination with Finger Pattern 3, we can play B♭ major in two octaves.
B♭ Major 2 octaves (Starting On G String, 2nd Finger)
Practice Goals
When practising scales, there are four things one needs to bear in mind:
- Pitch
- Tone
- Tempo
- Hand frame and bow alignment
It is very important to play scales in tune. The question is, how do you know whether you’re in tune or not? It’s best to practise with a teacher or a keyboardist, but this can be impractical for most people. Thus one can practise with a pitch generator instead: select the key note and let it play indefinitely at an audible volume. Anyone with sensitive ears will notice if a note is out of tune when it clashes with the given key note. The exception would be for the seventh note of the scale, as this note will clash for sure. I would not recommend anyone to use a tuner visually, i.e., by looking at the position of the needle. Remember, we want to train the ears, not the eyes.
It’s difficult to temper the tone of a violin. In the hands of beginners, it can sound screechy and unpleasant to the ears. It takes years of practice to master tone production, hence it’s best to start early. Practising scales is a good way to focus on building tone. In general, we want to produce a strong, healthy sound which is full of body and resonance on every note of each scale. I would recommend beginners to practise from the balance point to the tip of the bow for down bow, vice versa for up bow. This is to ensure that the bow pressure is applied to the string evenly. On the contrary, playing at the frog requires the violinist to release the bow pressure, and the technique can be difficult to do right. The volume has to be strong, projecting, and a bit unpleasant to the ears. Do not worry if it sounds loud and scratchy, you will get used to this sound. From about 5 metres away, the violin will sound just fine. Conversely, if it sounds pleasant to your ears, you are very likely playing too soft.
Tempo awareness is essential to music making. However, humans are not machines; we cannot do repetitive tasks consistently or our bodies will get tired and our concentration will drop. Thankfully, we have a device that can help us to keep tempo: the metronome. For beginners, I would set the tempo to 60bpm, and play each quarter (crotchet) note of the scale to two metronome ticks. Play each scale at least four times before moving on to the next scale. When practising to a metronome, one must feel comfortable, free from stress, and in control, otherwise the tempo set may be too fast (or too slow). The objective is to be aware of how the tempo flows and be at peace with it as if in a meditative state.
N.B. Always change your note together with the ticks, not before or after. It’s not a race, do not play faster to finish first.
Practising scales allows violinists to improve their playing technique. For the left hand, having the proper hand frame allows notes to be stopped effectively and efficiently. It also helps in shaping tone. The general rule here is to let the hand frame be naturally upright, free from tension, especially on the wrist. For beginners, it is advisable to put all the fingers down for every note. The fingers should fall strongly onto the fingerboard, and lifted quickly when required. For the right hand, there is only one secret to a good tone: keep the bow movement as straight as possible, parallel to the bridge, and placed between the bridge and fingerboard. Everything is easier said than done. Practising in front of a mirror can be really helpful to achieve the desired result.
Conclusion
Mastering scales is a vital part of music learning. In violin playing, practising scales will train our ears and hands to be familiar and ready with all keys/tonalities in music at any given moment. I hope that the given scale exercises will help you to build a solid violin playing foundation at the beginner level. Good luck!